
![How to Combine PDF Files in Google Drive in 2026 [2 Ways]](/images/pdf-editor/en/related-articles/25.jpg)

- About
- Discover EaseUS
- Reviews & Awards
- License Agreement
- Privacy Policy
- Student Discount
How to Password Protect Excel [Simple Tutorial]
Melissa Lee updated on Jun 16, 2026 | Home > PDF Knowledge Center | min read
- Update:
- Recently, Microsoft is making a change to its Microsoft Office branding. Microsoft Office is being renamed by Microsoft 365. After the official renaming, our article content will be updated accordingly.
PAGE CONTENT:
Many organizations still use Microsoft Excel to store and analyze data. If your Excel sheet contains sensitive information, Excel offers you a few simple security measures to keep it safe.
The easiest way to safeguard sensitive information from being altered or lost in Microsoft Excel when using Microsoft Office is to password-protect your file. You do not have to worry about someone accessing your data in Excel files if you have a password to secure your file. This post will discuss how to password-protect an Excel 2016 spreadsheet.
3 Way | Convert Password Protected PDF to Excel on Windows/Mac/Online
Many situations require you to convert password protected PDF to Excel. Whether you need to get deep insights into statistics or PDF contains various tables that need to be sorted in Excel, converting files into sheets becomes unavoidable.

Method 1. Password Protect Excel in Excel
The most popular approach to protect an Excel file is to encrypt it with a password if you do not want to share it with anybody and it contains personal information you do not want anyone to read.
Using this technique, you can password-protect an Excel 2016 file so that only the owner of the password can open it and view its contents. At the same time , you can also remove password from Excel if it is necessary.
You can use the procedures below to secure an Excel 2016 document with an open password:
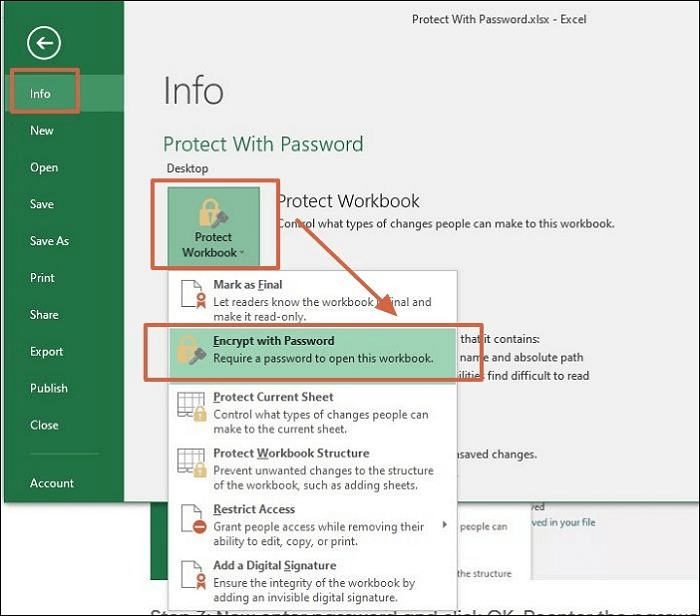
Step 1. Open the Excel document you want password-protect and click on the "File" tab.
Step 2. Next, go to the "Info" option on the left pane, click on the "Protect Workbook" button and choose "Encrypt with Password" from the drop-down menu.
Step 3. Next, decide and type a password in the "Encrypt Document" window. You will get a prompt to type the password again in the "Confirm Password" window.
- Notice:
- Your Excel worksheet is now password-protected; anyone who tries to access it must type in the password.
Method 2. Password Protect Excel with Aspose
Excel offers a UI to lock the Excel file. The same can be invoked using a programming language such as C#. Aspose is a software development company that offers APIS to lock and password-protect Microsoft Excel files.
The Aspose.Cells API is used in the example below to demonstrate how to encrypt and password-protect an Excel file:
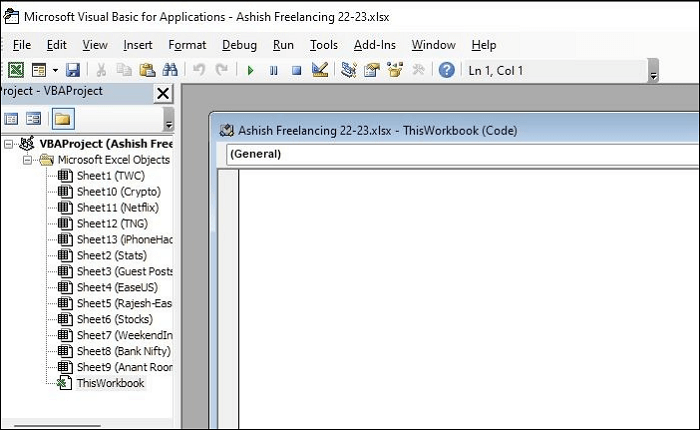
Step 1. Open the Excel file and press "ALT + F11" to open the "Visual Basic Code" interface.
Step 2. On the left side, look for "WorkBook". Double-click to open the code editor.
Step 3. Copy and paste the below code into the editor, and save the file. Copy and paste the code into the editor and change things accordingly.
//Instantiate a Workbook object.
//Open an excel file.
Workbook workbook = new Workbook("Book1.xls");
//Specify XOR encryption type.
workbook.SetEncryptionOptions(EncryptionType.XOR,40);
//Specify Strong Encryption type (RC4,Microsoft Strong Cryptographic Provider).
workbook.SetEncryptionOptions(EncryptionType.StrongCryptographicProvider, 128);
//Password protect the file.
workbook.Settings.Password = "1234";
//Save the excel file.
workbook.Save("encryptedBook1.xls");
Step 4. Once done, press "F5" to run the code, and it will apply the password.
- Notice:
- It comes in handy when you must programmatically lock multiple files using the same or user-specific password.
Method 3. Password Protect Excel by Using iLovePDF
You can finally convert Excel to PDF files using iLovePDF and protect it with a password. iLovePDF is an online tool that can offer a lot of converters and utilities for PDF files.
Right from merging, splitting, compressing, converting, and offering security. So, with this tool, you can password protect Excel or lock a PDF. It's a free tool, but since it's an online tool, there are limitations regarding the file size and processing.
Here is how to go about it:
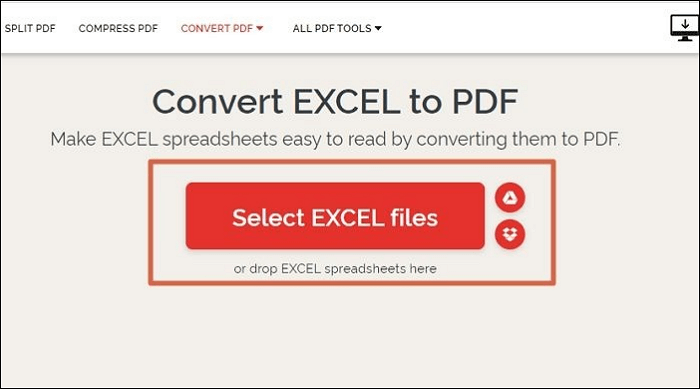
Step 1. Go to "Excel to PDF" tool.
Step 2. Click the "Select EXCEL files" button and upload the Excel file you want to convert and password-protect.
Step 3. After uploading the Excel file, click on the "Convert to PDF" button in the bottom right corner of the window. It will convert the Excel file to a PDF file.
Step 4. Next, go to the "Protect PDF" tool and upload the file you saved as a PDF.
Step 5. Under "SET A PASSWORD TO PROTECT YOUR PDF FILE", type a password in the two given password boxes.
Step 6. Click "Protect PDF" to save your document and click the "Download protected PDFs" button to download your protected PDF file.
- Notice:
- So, when you open the PDF file, a pop-up window asking for the password will open. Type the password to open the file.
Bonus Tip: How to Password Protect PDF on Windows
If you are looking for a robust application to password protect PDF files on Windows, then EaseUS PDF Editor is an excellent choice. Apart from protecting the content of the PDF file, you can also add additional security. The security option in the software allows you to restrict users to print, change content, copy text, images, and text access for screen readers.
Lastly, EaseUS PDF Editor offers a suite of tools to edit PDFs, allowing users to add, delete, and alter text and images and modify the structure and layout of existing documents.
Now click here and download this program!
Features:
- Add or remove password from PDF files
- Create PDF from scratch or create a blank PDF file
- OCR support makes image-based pdf editable
- Change the background of a PDF document
- Convert common document formats like Excel, Word, PPTX to PDF
Here are the steps to password protect PDF with EaseUS PDF Editor:
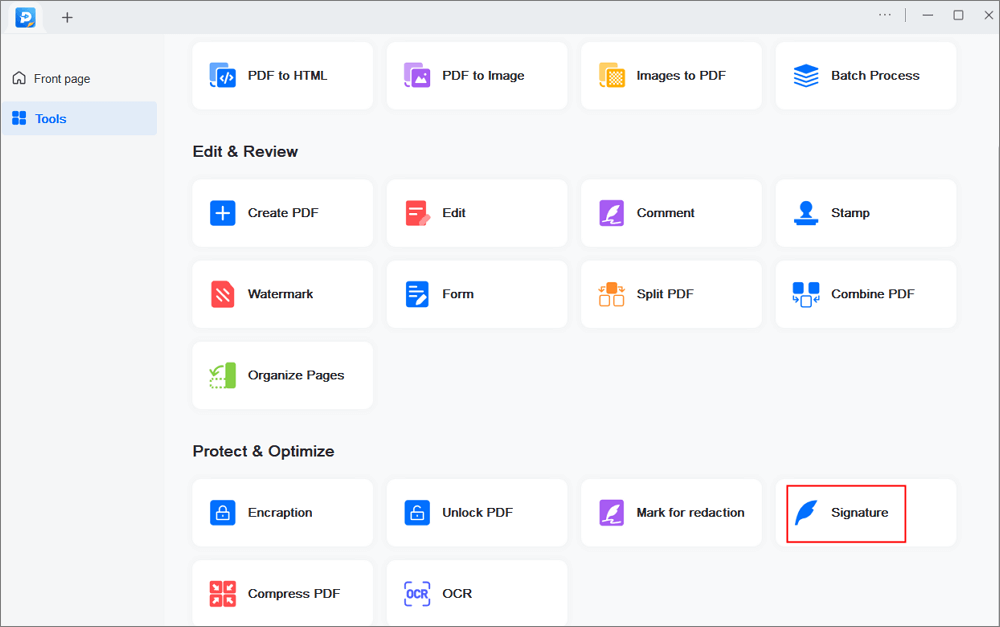
Step 1. Launch EaseUS PDF Editor and go to "Tools" > "Encraption". Choose the file you want to protect.
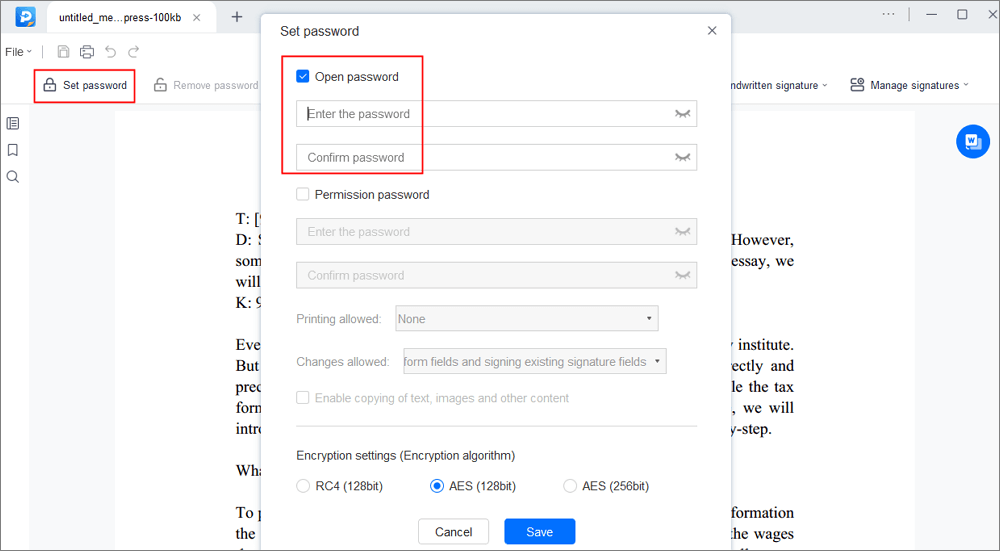
Step 2. In the next window, click "Set password". Then, check "Open pasword", enter your password, and click "Save".
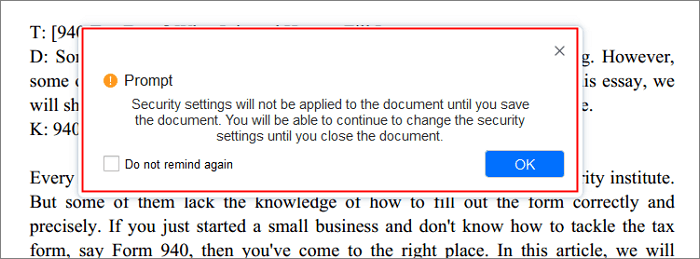
Step 3. When a pop-up window asking you if you want to apply the password to your document, click "OK". Your file will be protected.
Conclusion
Microsoft Excel is all about data. Most of the charts and tables created in Excel use confidential data that cannot be revealed to everyone. Hence, password-protect sheets and Excel files are essential and are only shared with authorized users.
The post has explained some of the best methods to secure the Excel file, including a built-in method, a VBA code, and an online tool. While you can use any online tool, it's best to use EaseUS PDF Editor to make the document uneditable and secure it with various degrees of protection.
FAQ on Password-Protect Excel
Do you have more questions about how to password-protect Excel? Check out the frequently asked questions and answers given below:
1. Can you hide and password-protect a sheet in Excel?
Yes, you can. To encrypt a workbook, go to "File > Info", select "Protect Workbook" from the drop-down menu, and then choose "Encrypt with Password". You should type a password in the Password field and click "OK" to open the "Encrypt Document" window.
Click on the worksheets that you want to hide. Go to the "Home" tab. In the Cells group, click "Format > Visibility > Hide & Unhide > Hide Sheet". To unhide worksheets, follow the same steps, but select "Unhide".
2. Is Excel password protection strong?
With worksheet password protection, you may restrict user access to only specific areas of the sheet, preventing them from editing data in other parts. Note that worksheet-level protection is not meant to be a security feature. It merely prohibits users from making changes to worksheet cells that have been locked.
3. How do you password-protect Excel for editing but allow read-only?
Step 1. Select "File > Save As".
Step 2. Choose where the file should be saved, such as "This PC > Documents".
Step 3. In the Save dialogue box, click "Tools > General" Options.
Step 4. In the General Options dialogue box, enter "Password" to open and check the Read-only recommended option, and click "OK". Once you save the file, your Excel file has a read-only password.
About the Author
Melissa Lee is a sophisticated editor for EaseUS in tech blog writing. She is proficient in writing articles related to screen recording, voice changing, and PDF file editing. She also wrote blogs about data recovery, disk partitioning, and data backup, etc.