- About
- Discover EaseUS
- Reviews & Awards
- License Agreement
- Privacy Policy
- Student Discount
How to Remove a Watermark in Word on Windows/Mac
Melissa Lee updated on Jan 05, 2026 | Home > PDF Knowledge Center | min read
- Update:
- Recently, Microsoft is making a change to its Microsoft Office branding. Microsoft Office is being renamed by Microsoft 365. After the official renaming, our article content will be updated accordingly.
Word files are the commonly used formats for exchanging documents globally. It offers a range of exemplary features helping users prepare documents according to their needs. Adding a watermark is one such feature that puts a logo, signature, or stamp on the Word file.
If you want to edit PDF in Word with a watermark, you need to remove it. Different reasons may compel the users to look for how to remove a watermark in Word. Some of these are:
- A poorly designed or extra-large watermark may hamper the Word file's looks.
- Watermark risks the reaching of potential clients to the user.
- It prevents the documents from being promoted on different channels.
- Watermarks can distract the reader from crucial information.
- It can ruin the purpose of the Word file.
So, let us help our readers solve the problem of removing a watermark in Word. We'll go through the detailed steps for Mac also, followed by the bonus tip to remove watermark from PDF.
How to Remove a Watermark in Word on Windows
After having a brief of the top reasons for removing a watermark in Word on Windows, it comes down to the steps for the same. The good news is that users can quickly remove watermarks in Word using the watermark menu or editing the header.

Let us go through both these steps one by one:
Method 1. Using the Watermark Menu
The quick steps to remove the watermark in Word on Mac/ Windows using the watermark menu are:
Step 1. Open the Word file with the watermark in your system.
Step 2. Go to the "Page Layout" option.
Step 3. Select the "Remove Watermark" option.
Method 2. Editing the Header
The quick steps to remove the watermark in Word on Mac/ Windows by editing the header are:
Step 1. Go to the "Insert" menu.
Step 2. Go to the "Header" option and select "Edit Header".
Step 3. Select the watermark and remove it.
2026 | Top 7 PDF Editor Without Watermark
PDF is a widely-used document format all around the world as files in this format are easy to create, edit, as well as share with others. If you want to edit a PDF file, a powerful PDF editor is indispensable.

How to Remove a Watermark in Word on Mac
After going through the detailed methods to remove a watermark in Word on Windows, it comes down to Mac. The best part here is that Mac users can get rid of the watermarks in Word in simple steps only.

The quick steps to remove a watermark in Word on Mac are:
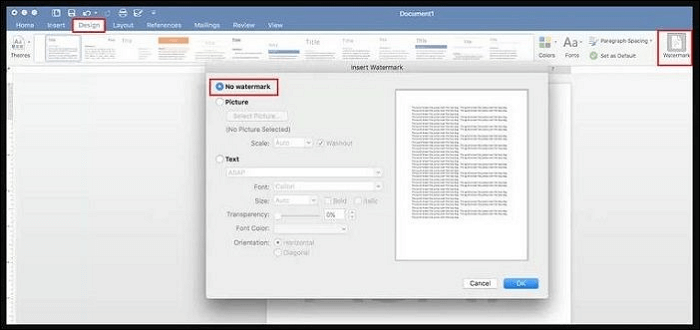
Step 1. Go to the "Design" tab.
Step 2. Go to the "Page Background group" and select the "Watermark" option.
Step 3. Select "No Watermark".
Bonus Tip: How to Remove a Watermark in PDF
After going through the top techniques to remove a watermark in Word on Windows/ Mac, users may look for solutions for PDFs. EaseUS PDF Editor is the perfect solution when it is to remove watermarks in PDFs. Let us know more about this efficient tool in detail.
EaseUS PDF Editor is the all-in-one PDF editing software used to manage, convert, and create PDFs. It can create PDFs from different file formats and supports PDF conversion in more than ten file formats. You can also edit a scanned PDF with EaseUS PDF Editor. Don't wait, just click here and download it!
Features of EaseUS PDF Editor:
- It can delete or add watermark to PDF
- It allows quick PDF signing with ease
- It can help users send PDFs through email directly
- It supports PDF conversion into multiple file formats
- It serves as a powerful PDF management software
Here are the steps to remove a watermark from a PDF:
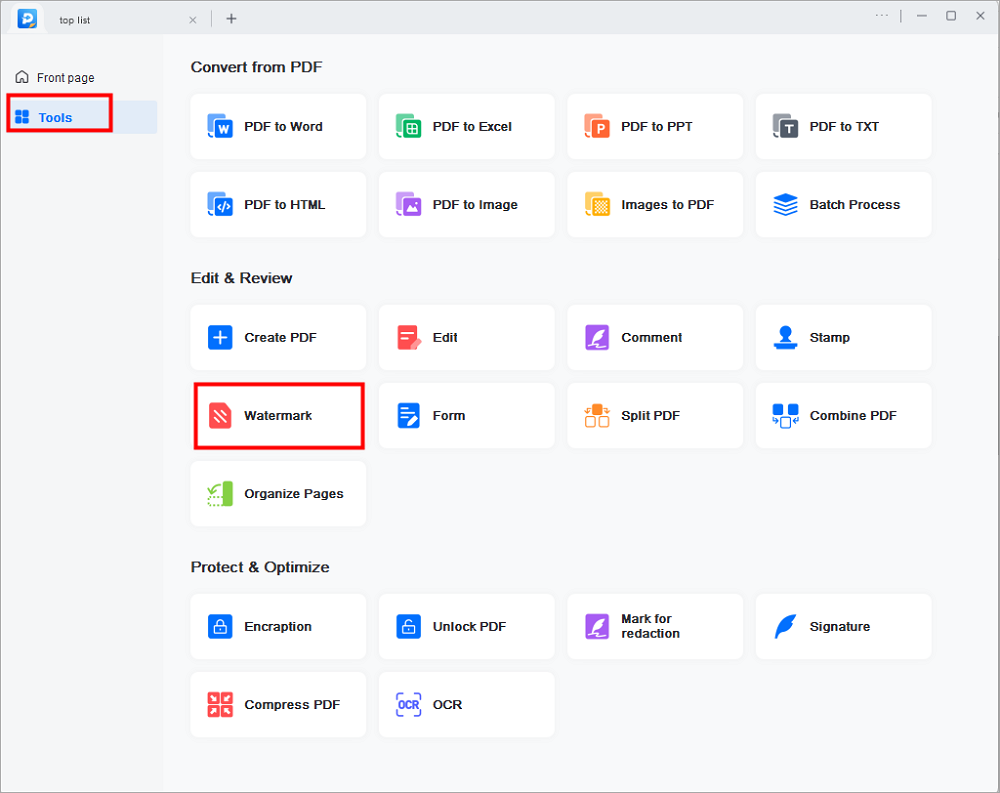
Step 1. Launch EaseUS PDF Editor, and click Tools on the left panel.

Step 2. Choose the Watermark option in the Edit & Review tab, then import the PDF files that you want to add or remove watermark.

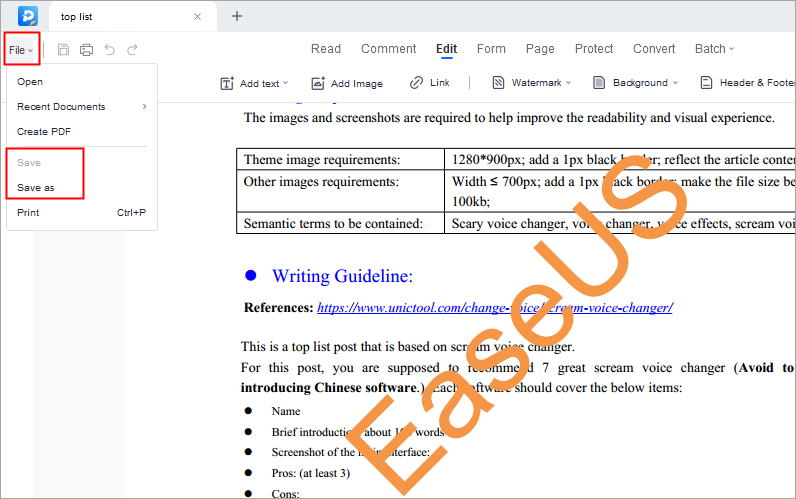
Step 3. When the PDF is opened, click the Watermark button. Here, you will see three options, including Add watermark, Remove watermark, and Update watermark. Just choose the one that suits your needs.

Step 4. Once done, click File > Save as to export your edited PDF file. Or, you can directly press Ctrl + S on your keyboard.

Conclusion
Hope everything is clear to our readers about the different methods how to remove a watermark in Word. Watermarks may need to be removed due to different reasons like focusing on the Word's purpose, eliminating distraction, enabling publications, etc.
For removing a watermark in Word, it is easy to complete it using the Watermark menu or editing the header. Users looking to remove it from the Word files on Mac can go for the Design or Page Layout options. Not to miss is the quick removal of the watermark in PDFs using the EaseUS PDF Editor.
FAQ on How to Remove a Watermark in Word
After going through all about how to remove a watermark in Word for Mac, you may have some questions related to the same. So, below is a quick list of the top and frequently asked questions related to removing a watermark in Word:
1. Why can't I remove the watermark on my Word document?
Sometimes users can't remove the watermark on the Word document due to the settings on the document. Hence, it calls for a dedicated method to remove it manually.
2. Is the watermark removable?
Yes, the watermark is removable. All you need to do is go for the different methods to remove a watermark in Word on Windows/ Mac or remove watermarks from PDFs.
3. How do I remove a watermark for free?
The different methods to remove a watermark for free on Word include using a watermark menu or editing the header. For removing a watermark in Word on Mac, users can go for the Design or Page Layout options.
About the Author
Melissa Lee is a sophisticated editor for EaseUS in tech blog writing. She is proficient in writing articles related to screen recording, voice changing, and PDF file editing. She also wrote blogs about data recovery, disk partitioning, and data backup, etc.


![How to Make Adobe Default PDF Viewer on Mac/Windows [Updated 2025]](/images/pdf-editor/en/related-articles/23.jpg)