- About
- Discover EaseUS
- Reviews & Awards
- License Agreement
- Privacy Policy
- Student Discount
2026 | How to Compress a PDF on Mac for Free
Melissa Lee updated on Jan 05, 2026 | Home > PDF Knowledge Center | min read
- Update:
- Recently, Microsoft is making a change to its Microsoft Office branding. Microsoft Office is being renamed by Microsoft 365. After the official renaming, our article content will be updated accordingly.
PDF sometimes becomes so large, especially when it contains hundreds of images, data, forms, etc. Large files can take up a lot of computer storage space and are becoming difficult for sending with others.
Compressing files to a smaller size is an essential way to solve these issues. PDFs in smaller sizes have benefits like faster downloads, effective email sharing, and saving computers and cloud storage. There might be various methods to resize PDFs. One of the best ways is using effective PDF editors. Here, this post guides you on how to compress a PDF on Mac.
How to Reduce the Size of a PDF in Preview on Mac
Preview is the default application on Mac, and you can easily use this tool to make your PDFs smaller. It allows you to send the files through emails easily, and meanwhile, it can enhance your efficiency at work.
This Mac editing software also comes with other features, for example, you can use this tool to create bookmarks in PDF. Though this tool is automatically set as the default PDF application, you can basically edit a PDF according to your needs.
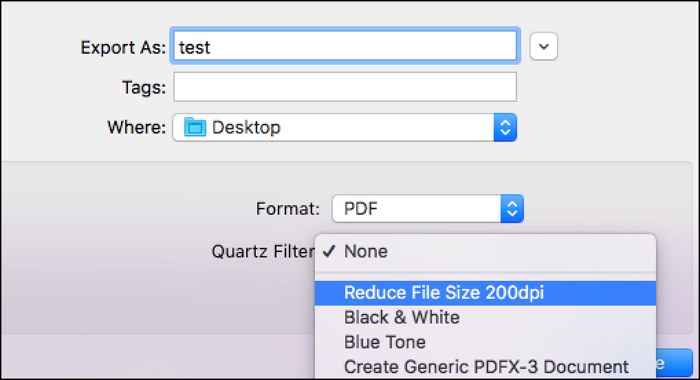
How to compress a PDF on Mac with Preview, and you can follow this guide to operate your task:
Step 1. Firstly, open the PDF on Mac. Or you can right-click on the file and select "Open with" followed by this function.
Step 2. Once the file is opened, select the "File" on the top toolbar and then select "Export". A pop-up window will appear over the top-middle section of the PDF.
Step 3. Click the drop-down menu for "Quartz Filter" and then select "Reduce File Size". Finally, you should click "Save".
How to Compress a PDF in Adobe on Mac
Adobe Acrobat Pro is another functional tool that helps you reduce the size of a PDF file on Mac. This editing software is well-known for its complete and powerful functions as it contains all the common features on the market. It can be used both on Mac and Windows computers. Using this tool for compressing PDF files is super easy with a few clicks so that you can share them via email conveniently.
You can convert a PDF to multiple formats, including editable Microsoft files such as Word, Excel, Powerpoint, and image files like JPG. Editing a PDF document is also easy using Adobe Acrobat Pro. You can reorder, delete, rotate, or combine pages and sign a PDF document. There is also the option to prepare a PDF form.
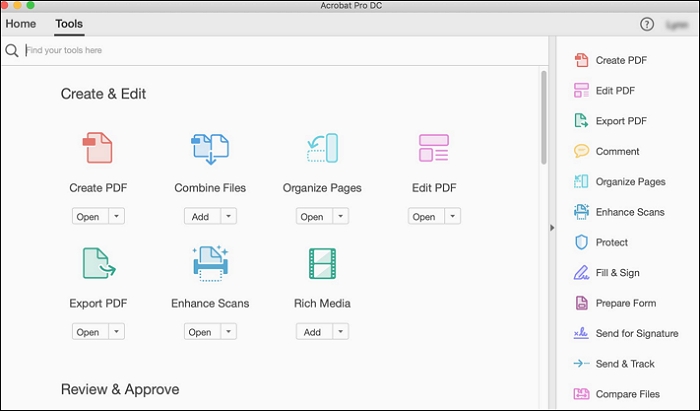
Before using this editor, follow these steps to help you operate this task efficiently:
Step 1. Open this editor on your Mac. Select the file you want to compress and then go to the next step.
Step 2. Choose the "Optimize PDF tool" option. Then, you should click on the "Reduce File Size" and you will see a dialogue window. You need to click "OK".
Step 3. Give a name to your compressed file, and then click on the "Save" option.
Bonus Tips: Reduce the size of a PDF on Windows Easily
The above tools are suitable for Mac users. However, If you are a Windows user, then the following post might be useful for you. With the helpful editor, you can get a distinct change on your files.
EaseUS PDF Editor is a representative of the powerful PDF maker that allows you to reduce the size of a PDF efficiently. Reducing large PDF files to smaller sizes will improve efficiency and enhance convenience in your work.
It is worth noting that you have the choice to optimize your PDF when compressing. For example, you can clean up invalid items like bookmarks and links to better operate this task. To reduce the size of your PDF file using this editor, just put your files in it and click the function button. Finally, you will get the PDF file with reduced size for easy and convenient sharing.
Meanwhile, more about this excellent editing tool comes with useful PDF editing features that you can use to edit PDF. Using it, you can highlight PDF, edit and add images, crop, split, merge, and a lot more with this powerful PDF tool.
This Windows PDF editor allows you to have a compressed PDF through:
- Compress a PDF without losing quality
- Optimize a PDF while compressing
- More settings on images, fonts, discard objects, and so on
- Make PDF editable, searchable, and convertible
For Windows users, this editor is a good choice for making a change in your PDF.
Here, you can follow these simple steps to create a reduced size PDF:
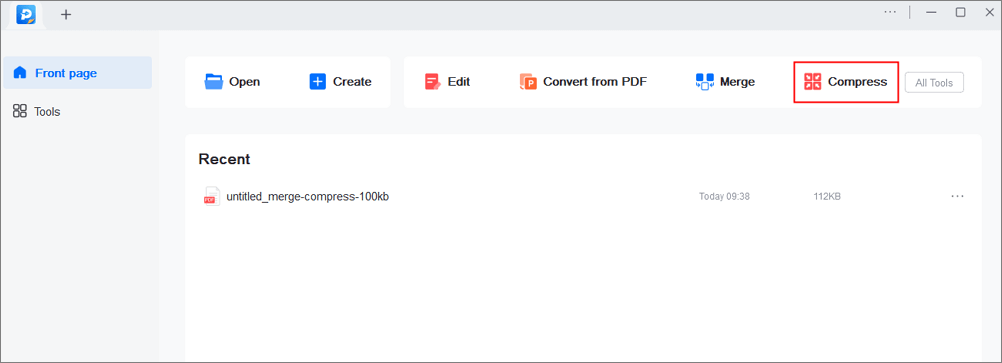
Step 1. Launch EaseUS PDF Editor and click on the "Compress" button to import your PDF document.
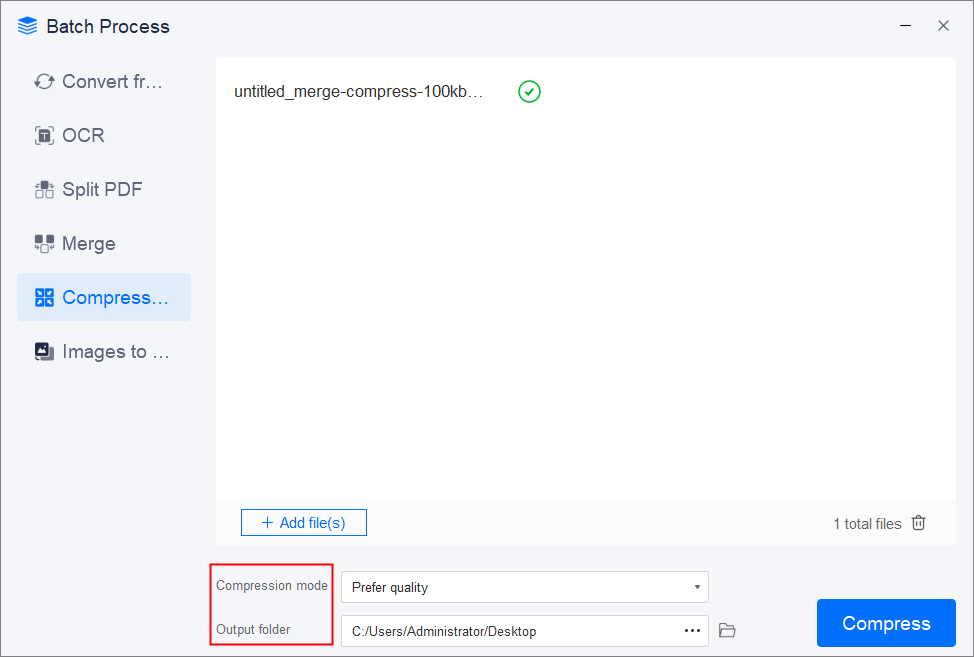
Step 2. In "Compression mode", choose "Prefer quality" or "Prefer compression". The first one will give priority to the document quality; while the second will try to compress the file as much as possible. Then, choose a folder for the compressed PDF and click "Compress" to start.
Step 3. After compression, you will be lead to the exported PDF file on your computer.
About the Author
Melissa Lee is a sophisticated editor for EaseUS in tech blog writing. She is proficient in writing articles related to screen recording, voice changing, and PDF file editing. She also wrote blogs about data recovery, disk partitioning, and data backup, etc.

![[2026] Best Ways to Convert PDF to MIDI Easily](/images/pdf-editor/en/related-articles/13.jpg)
