- About
- Discover EaseUS
- Reviews & Awards
- License Agreement
- Privacy Policy
- Student Discount
2026 | How to Make a Certified PDF on Windows 10
Jane Zhou updated on Jan 05, 2026 | Home > PDF Editor Tutorials | min read
One efficient way to protect your PDF file is to add the certification into it. Certifying a PDF file is beneficial because anyone who receives the file can notice the information from the owner. Even people modify it, the certificate is still valid.
If you are the author of a PDF file, you can certify it to add your personal information. The PDF file with certification is having a certifying signature that can be invisible or visible, based on your choice. To make a certified PDF file, you need PDF editing software. Here, the three Windows 10 best free PDF editor are introduced. Follow this post and refer to the guides below.
How to Certify a PDF with EaseUS PDF Editor
As one best Windows PDF editing software, EaseUS PDF Editor provides you with many features to edit, manage, protect the PDF file. It can create signable PDF, and most importantly, certify your PDF file with detailed information. You can use the certification to increase the security of the document. To protect some essential files, it's needed.
When applying this function, there is a lot of information you can add. The appearance of the certification can show the reason, location, date, and other information for this certified document. Also, like Adobe, you are allowed to set the permitted actions after certifying. Apart from the protecting feature, you can explore more functions in this tool.
Key Features:
- Certify a PDF file with reason, time, etc.
- Remove signature from PDF
- Compress a PDF file without losing quality
- Convert JPG to PDF or vice versa
- Make the PDF file editable, searchable, and signable
Congratulations that you catch the precious chance to download this PDF editor!
Follow the below tutorial to learn how to certify a PDF on Windows 10 step-by-step:
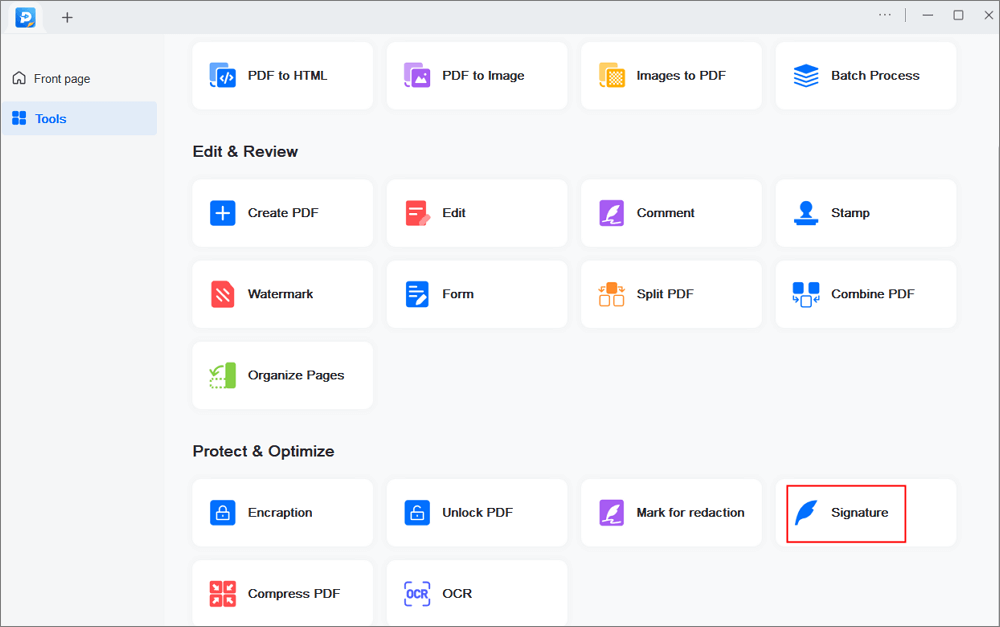
Step 1. Launch EaseUS PDF Editor and click "Tools". Then, choose "Signature". Import your PDF file form your computer. If the file is locked, you need to enter the password to unlock it first.

Step 2. In the next window, you will see a tool bar containing "Digital signatures", "Handwriting signature", "Manage signatures", etc. Choose the one you need.

Step 3. After editing, you can click "File" > "Save as" to save the PDF file to your computer.

How to Make a Certified PDF with Adobe Acrobat Pro
To get a certified file for PDF on Windows, Adobe Acrobat Pro could be your choice. This tool is famous for its PDF editing functions, which can help manage, protect, and convert PDF files. Many users know it can sign a file digitally, moreover, it can certify your file. Its documental signing certificates provide you with both signed and certified files.
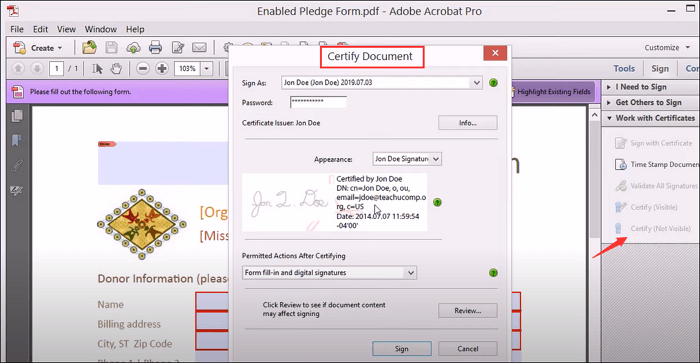
In its Certify Document feature, you can insert the password, and view its appearance with time and email information. Also, it's accessible to allow the permitted action after protecting the file. Below is a guide.

Here is a list of steps on how to certify a PDF file with Adobe:
Step 1. Import your PDF file into this PDF editor. Then, open the Tools tab.
Step 2. From various features, you should find and select the Certificates tool and hit it. Then, you see the ribbon on the top side, and there are options to Certify (Visible Signature). Here you should click it.
Step 3. Once you fill in the information, you can get a PDF file with certification easily. You can save it on your computer before sharing it with others.
How to Sign PDF in Adobe Reader?
To know how to sign a PDF file with Adobe Reader, follow this post. You can learn the method easily. Without printing a file, you can deal with the document with the time-saving method.

How to Make a Certified PDF with Nitro PDF Pro
With beneficial functions to meet the basic needs for editing a PDF file, Nitro PDF Pro can help edit, manage, protect, and review a PDF easily. One incredible function is to certify a PDF, showing the reason and other information for the certification. People who apply this feature can protect their documents effectively.
The operation is very easy as you can follow the steps below. But one thing to be ensured is that you need to share the certified file with others who have the PDF viewer with the ability to allow checking the certification and signature efficiently. For example, you can share with people who have Adobe Reader to view the file.

Certify a PDF file, with Nitro PDF Pro:
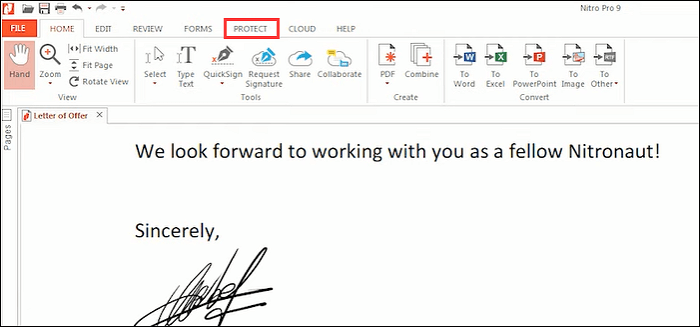
Step 1. Download this PDF editor and open it. Import your selected file into this tool. Then, from the top toolbar, click the "PROTECT" tab and choose "Certify Document" > "Certify".
Step 2. From the Certify Profile Wizard, you should select the information you want to add to this file. Then, select the actions from the Permitted list. After that, choose "Next".
Step 3. Choose a digital IDF when certifying this file. Here, it's optional to make the certificate visible or not. Hit "Next" to show another window. From the Certify Document window, you have choices to set a reason for signing, save the file to the current location, and choose the appearance for the certified file.
Step 4. Once you are satisfied with the edited document, click "Finish".
Conclusion
Now, you learn three efficient tools to make a certified PDF with ease. You can use one of them to protect the document. Amony the three Windows editing tools, EaseUS PDF Editor is the best solution to deal with your file, as it offers various functions to edit, sign, and certify your PDF. Now, catch this chance to download it!
About the Author
Jane is an experienced editor for EaseUS focused on tech blog writing. Familiar with all kinds of video/PDF editing and screen recording software on the market, she specializes in composing posts about recording and editing videos. All the topics she chooses are aimed at providing more instructive information to users.

![[2026] How to View PDF Pages Side by Side on Windows/Mac](/images/pdf-editor/en/related-articles/39.jpg)
![[2026] How to Search a Scanned PDF in 3 Methods Easily](/images/pdf-editor/en/related-articles/2.jpg)
![Print PDF in Windows 7 [2026 New!]](/images/pdf-editor/en/related-articles/34.jpg)